Pet Snacks Storage Simplified
Pet Snacks Storage Simplified is a practical guide for pet lovers who want to keep treats organized, fresh, and easily accessible. Whether you have a small dog, a cat, or a multi‑species household, cluttered cabinets or missing treats can lead to frustration and even spoiled inventory. In this article, we dive into proven organization strategies, storage options, and best‑practice habits that keep your pet’s snacks in top shape and make snacking time hassle‑free.
Why Organization Matters for Pet Treats
Proper organization protects the nutritional value of treats, reduces waste, and prompts safe feeding habits. Studies linked to the American Veterinary Medical Association demonstrate that consistent, clear storage routines lower the chances of accidental overeating and help maintain a pet’s healthy weight (see AVMA resource). Additionally, organized treat jars and containers signal to your pet which items are safe, preventing confusion that can lead to ingestion of spoiled or unsafe goods.
Choosing the Right Containers for Treat Longevity
Different treats—hard biscuits, soft patches, or homemade cookies—require specific storage conditions. The ideal containers balance protection from moisture, oxygen, and light while still allowing easy identification and access. Below are key container types that work best for pet snacks:
- Vacuum‑sealed bags: Removing air keeps bulk treats like jerky fresh for months. Research shows sealed barriers significantly delay spoilage.
- Opaque glass jars: Nontoxic, airtight, and easy to label. They’re ideal for small, airtight treats like biscuits or crunchy seeds.
- Silicone food‑grade containers: Flexible, stackable, and dishwasher safe—great for portions and for pets that prefer a chin‑or‑paws‑friendly cup.
- Plastic snack tubs with snap‑on lids: Budget‑friendly and come in various sizes, perfect for daily portions.
- Dedicated treat bags per pet: Clear, separate sections allow each pet to see only their portion, preventing cross‑species contamination.
For long‑term storage, avoid plastic containers that leach chemicals into treats (check the FDA guidelines on plastic food safety via FDA website), and keep items out of direct sunlight or hot spots to protect flavors and nutrients.
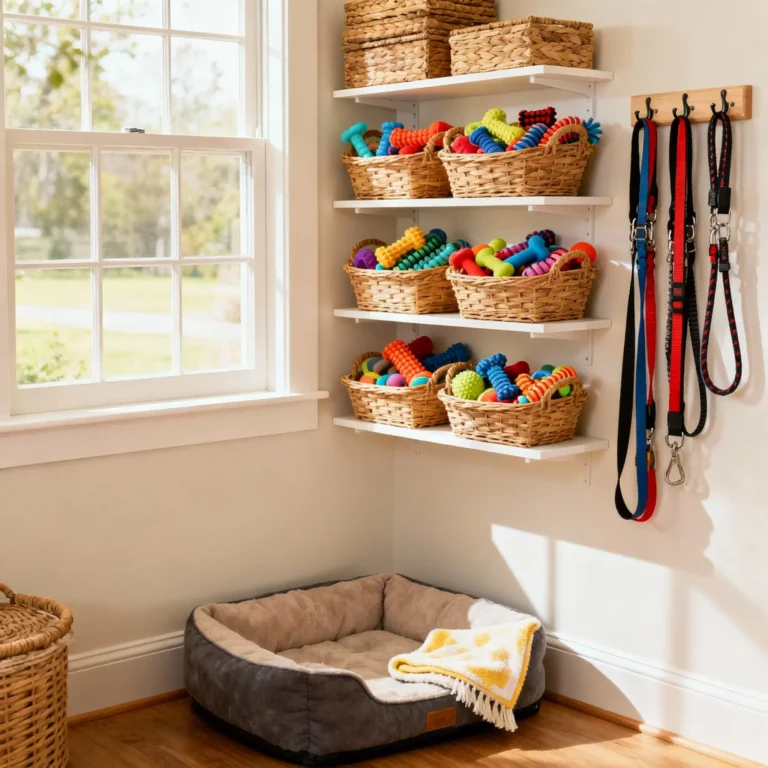
Smart Placement: Where to Store Treats in Your Home
The placement of snack storage influences both convenience and safety. Below are placement strategies that increase visibility while keeping treats out of reach of curious cats or curious children:
- Pet‑friendly cabinets: Use a basket or tiered shelf in a kitchen or pantry. This spot keeps treats within the pet’s sight but just out of grasp unless you purposely lower the basket for them.
- Dedicated treat station: Install a horizontal dog or cat treat station in a walkable area. Use a small countertop and clear labeling—this encourages portion control and keeps treats organized at eye level.
- Under‑counter storage: For larger families, an under‑counter drawer with labeled bins works best. Label each bin with the pet’s name and treat type, ensuring quick visual identification.
- Rotating carousel: Combine a lazy‑sus or rotating dish for daily portions with a separate bulk storage container underneath. This keeps fresh snacks front and center while filling your dishwasher-friendly containers with the rest.
- Mobile cart: A cheese or snack cart on wheels can be moved between rooms and collapsed when not in use, cooling off snacks on calm surfaces without a fridge.
Consider integrating a small refrigeration unit for perishable treats, like fresh fish or chicken bites, but only if you can consistently monitor temperature. The USDA states that low‑humidity refrigeration preserves animal food quality for up to 7–10 days (see USDA guidelines).
Labeling and Rotation: A System to Keep Snacks Fresh
Clear labeling is a game‑changer. Use waterproof, food‑grade labels or stickers that resist moisture and odors. Each label should state:
- The treat type and brand (or homemade recipe)
- The date of opening or sealing
- The pet’s name when using multiple animals
- Any special dietary instructions or allergies
Once labeled, apply a first‑in, first‑out (FIFO) rotation system. Treats in the front should be distributed before those at the back. This simple habit reduces spoilage and ensures your pet receives the freshest items, supporting optimal nutrition (according to the World Health Organization on pet health).
To further streamline, use a small calendar or magnetic marker board near the storage area. Every week, set a reminder to check expiration dates and toss expired treats. A user‑friendly “treat diary” mobile app can also track frequency, portioning, and flavor preferences.
DIY Organization Hacks for Busy Pet Owners
Use everyday household items to fashion an inexpensive and efficient treat setup. Below are three DIY hacks that maximize space while keeping treats sorted:
- DIY vertical shelf: Attach a shallow wooden board to a wall and add plastic hangers to hold jars. The vertical design frees up counter space and creates a “snack wall.”
- Second‑hand baskets: Upcycled wicker or plastic baskets can be grouped in a clear plastic bin with individual slots. Add a small label at each bottom.
- Recycled bottle tops: For small or portable treats, bottle tops can serve as slip‑in holders on a binder or magnetic board. This works great for homemade chewy treats packed in dry heat.
When constructing these DIY setups, always confirm that materials do not contain harmful chemicals. The EPA notes that food contact surfaces should be BPA‑free to avoid toxin exposure.
Monthly Checklist: Maintain Treat Shelf Life and Safety
Creating a simple monthly routine keeps your treat pantry in tip‑top condition. Check off each task in your treat diary or digital calendar:
- Inspect all containers for leaks or mold.
- Throw out expired or moldy treats.
- Clean the storage space with a pet‑safe disinfectant (e.g., diluted vinegar).
- Re‑label opened bags with new dates.
- Rotate all treats to ensure FIFO.
- Stock up on fresh treats from reputable suppliers.
Adopting this meticulous regimen encourages safer and cleaner treat handling, extending the life of each snack and protecting your pet’s health (aligned with AVMA recommendations).
Conclusion: Keep Snacks Organized, Fresh, and Accessible
By implementing these simple storage strategies, labeling protocols, and a consistent rotation schedule, you can keep your pet’s snacks organized and ready for any snacking moment. A tidy treat cabinet not only ensures freshness but also fosters responsible feeding practices that support your pet’s overall well‑being. Start today—organize your Pet Snacks and elevate the snacking experience for both you and your furry companion.
Frequently Asked Questions
Q1. How often should I replace my pet’s treats?
Most commercial treats last 6–12 months if stored in airtight containers. Homemade treats should be replaced within 3–4 days of preparation to maintain safety and freshness.
Q2. Can I mix treats from different brands in the same container?
Yes, but label each batch separately. Mixing allows quick inventory checks and ensures you’re not over‑releasing a particular brand’s sugar content.
Q3. Are there safe alternative treat storage options for pets that chew hard on containers?
Use large, impact‑resistant glass jars with secure lids. You may also consider silicone or stainless‑steel containers that can withstand gnawing but still seal for freshness.
Q4. How do I store perishable treats like fresh chicken or fish?
Keep these items in a small refrigerator unit or insulated cooler bag with ice packs. Consume within 2 days and discard anything that smells off.
Q5. What should I do if I notice mold on a treat?
Dispose of the moldy treat immediately, wash the container with hot soapy water, and dry thoroughly. Do not use the moldy item again.